Saturday, April 28, 2012

Summer Sun Jars

Summer is coming and I'm ready to be outside. I saw these mason jar solar lights on etsy almost a year ago and have wanted to try making it myself. I read on different blogs about tinting the jars with a product called Mod Podge. I have been waiting to try this out and finally found the time. This is the right time, not only because I wrote my last exam of the semester this afternoon(!!!), but the solar garden lights were on sale at Canadian Tire for a dollar each. I found outdoor Mod Podge at Michaels and I already had a bunch of jars that I have been saving.


The first method I tried was The Hand me Down House blog. It was really easy, added food colour and painted it on. The solar lights I found the light part just screwed off. It had the light sticking out the bottom, so Hubby drilled a little hole and I just set them inside.
I added a bit of texture and they look really nice. Unfortunately, Canadian weather came, it snowed a day or so later after this. I am not sure why, but the colour came off a bunch. I don't if it was not completley dry or if it doesn't withstand our weather well.
With a little more garden research I found another method here This included pouring it inside and baking it in the oven on very low for a bit. I didn't let mine drip out and got a bit of a puddle on the bottom. I think it looks pretty cool though.


The darkest one just had thicker Mod Podge. I think this will work, being protected from our crazy weather. I didn't have 3 identical jars, so I just randomly picked a few from the cupboard. I think it looks better this way.


It glows Blue!! I have them sitting outside on my table as a centerpeice now, but they would look cool randomly around your garden or as a path to your house in the front!

Overall, I recycled the jars (FREE), bought garden lights for $1 each on sale and bought a jar of Mod Podge ($7) and used about a third. They were also super easy and quick.

Can't wait to do more summer crafts!!!

Thursday, April 26, 2012

Inspired By Buttons

At Christmas time my family draws names. I have 5 siblings and 3 of us are now married, so buying presents for everyone would be a big expense. Or in my case, everyone would probably get handmade gift certificates for 1 free hug. The thing is I love finding the perfect present for everyone or choosing a theme and collecting a bunch of little stuff. This year I drew my little sis and my husband drew my big sis. So, in essence, I got both of my sisters. They are very different, but they both bought property recently. So, I was scouring etsy for the perfect idea. I narrowed it down to some sort of household item pretty quickly and then I found these pillows...


I thought they were so cute, but expensive. We have a 50$ budget and with that I would only be able to get them one each. Therefore, I decided to make them myself. It should be easy... I mean how hard could it be to sew a few buttons on a pillow?! I bought a few plain pillow covers from Ikea for like $9 and the actual cushions for about $6 each. I looked other places, but I couldn't find ones with strong enough covers that could hold all of the buttons, so I splurged at Ikea. Anyways, my younger sister got 2 and older got 3. (No, I am not playing favourites, my younger sister got another little present too!)

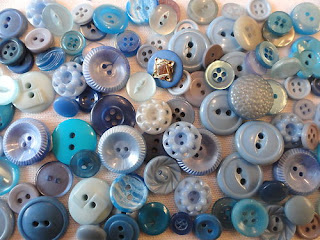
I bought buttons from ebay. I looked at button lots and bought a few lots of blues and teals. Most were vintage but I bought one lot of new ones that I liked the colours of. I bought about 250 buttons and spent probably $12. And I did use all the buttons.

On a side note... I love the way buttons look. I have no idea why, but they totally inspire me.

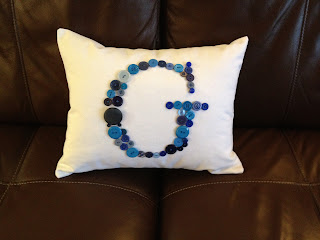
For my first pillow I took a pencil and drew on the letter. This wasn't the greatest idea because erasing it turned out to be pretty difficult. For the next ones I just put dots on to show me the corner of the letters. That was much more successful and easy to follow. I then sewed on every button individually, using embroidary thread. It took a bit of practice but got much easier as I went along. My little sister got an A and a Star. My older sister got a L, a heart and a N. I can not sew by hand and it took me a long time. I worked on it for weeks...every evening sewing a few on. I do have really bad eyesight, so threading the needle was a pain.

Here are how mine turned out....

Overall I spent for each pillow
$9 - for cover
$4 - for cushion
$2.5 - for buttons (on average)
$15.5 per pillow!!

It was much cheaper.... but, if I consider what my time is worth... not too sure.

Overall, I think they are pretty cool, and it came from the heart and a few weeks before Christmas my great-grandma passed away (she was 101!!). I asked my mom for a few buttons from some of her clothes. So, I sewed a few on each of the pillows for my sisters. You can see them on the corners of the pillow with the star. Now they have even a bit more meaning for everyone.

Wednesday, April 25, 2012

Thinking Back - Baby's First Birthday!

My little dude's 2nd birthday is coming up and it has me reflecting on his first. I was quite (overly?) ambitious for little dudes first birthday. But, it is a big event. It means we managed to keep him alive for an entire year and we are still somewhat sane.

I had been wanting to try making a fondant cake since cake shows started appearing all over TV. My little dude's first birthday seemed like the perfect event. As he was a cow for his first Halloween, I decided to carry that theme through and do a barnyard theme for his first birthday. I had also had a book for a long time showing me how to make cute little animals that I really wanted to try out. I searched the internet for inspiration and found quite a few ideas. I showed Hubby, who said I should do whatever I like, but he wasn't interested in helping me.

I went to look at buying fondant and found that it was ridiculously expensive to purchase ready made. So, I thought I could make my own. A search on the internet brought up marshmallow fondant and many reviews said it tasted great. I then had to decide what type of cake and buttercream to make. I tried to figure out what went with marshmallows and I obviously landed on chocolate and graham cracker... a s'mores cake! For the graham cracker cake I started with a vanilla box cake (I know, I know, I'm a terrible person) and added a few ingrediants. I found a  recipe for chocolate buttercream, which turned out to be really simple and tasted like heaven.

I started assembling the cakes the day before. Getting the buttercream on smooth was not as easy as Cake Boss made it look like. I struggled for a bit, until Hubby came to check out the progress. He gave me suggestions and promotly took over. He is a perfectionist and made it look perfect. We did the fondant together. I had made it at my mom's the day before, because she has a bix mixer and making the fondant would have been almost impossible without it. The only thing I should have done differently was mix the main colour into the fondant with the mixer, because doing it by hand was A LOT of work!

I shaped the little animals and built the barn out of Rice Crispie treats, while Hubby covered the cake and made the fence. It was much more work than anticpated and took us into the early morning. After a few hours of sleep we got up for the big day. It looked nice, but I had seen on Cake Boss that they always steam their cakes to make them look shiny. We don't have a steamer sitting around, so Hubby suggested we use the iron... It seemed like a risky idea to me. I was terrified that we would either melt the cake. In the end he did it anyways and it looked awesome.

Here is the finished product... What do you think?


Of course, for a first birthday you also need a smash cake. I am too cheep to buy a small cake pan, so I bought a little metal bowl from the dollar store, greased it really well and made a tiny version of the cake in it. I covered it with fondant and gave it a cow pattern. It was really quick.

I really enjoyed the process. Hubby says he is never doing it again...


That was last years project and we are quickly approaching Little Dude's second birthday. It happens to fall on mother's day and I have a ton of ideas up my sleeve!

Monday, April 23, 2012

What came first the crafty or the cheap?

What can first the chicken or the egg? - this is another one of those questions...

Am I crafty and therefore doing it myself saves me money, or do I save money because I think I can do everything just as well without spending a ton of money? I am an idea person, I always see things, often online, sometimes shopping, or at a friends house, and I'm pretty sure that I can reproduce it. My parents instilled a bit too much "you can do whatever you set your mind to" in me. Etsy is the worst for me. I see things and decide I can make it just as well myself, so I can not possibly justify spending so much money on it... It does generally comes out slightly cheaper, but has taken 10 times as much time as I guessed. My hourly wage ends up being like 10 cents. Not very often do I do something that I think wow that was easy... Anyways, it doesn't really matter what came first.. Truth is "My name is Sara and I am a cheapy crafter."