Showing posts with label smash cake. Show all posts

Wednesday, September 12, 2012

Safari Birthday

My good friend asked me to help her make her son's first birthday cake. I decided it was the least I could do to celebrate the fact that they had survived their first year together as a family. I was excited to help, but nervous when she said that there would be almost 60 guests at this party! This meant it would have to be much larger than any of the cakes I had made so far.

She choose the theme "safari." After much googling, I came up with a few ideas. The original idea looked somewhat like this. 2 tiers, covered in fondant. On the inside I made a marble cake, chocolate and white cake. It ended up being pretty neat, because when it was cut it looked like zebra stripes. ( just google "zebra cake batter design" and you will see what I am taking about and how to do it). We also decided to do a little smash cake in the shape of a safari hat.

I baked the cakes, leveled and added crumb coat, with the help of my husband, the day before we decorated. Then, I let them set overnight in the fridge to make the icing nice and hard. The key is to cut the "domes" that form while baking all the way off to leave a level top on each cake. Then, put a thick layer of buttercream of the top. Take the second layer, and place it cut side down on the buttercream. It can be pressed a bit to make it completely level on top. Now you have the somewhat smoother bottom on top, which is much easier to ice than the crumbly side that was cut. A generous layer of buttercream is added on the whole cake. This is important because it helps the fondant stick.

I had pre made the fondant with the help of my mom. She has a kitchen aid mixer, so it makes the process much simpler. I made marshmallow fondant, as I mentioned in other posts, however, this time I precoloured them all in the mixer to avoid having to do it by hand again. This simply required a bit of planning to know approximately what I wanted. I did leave one chunk white, so that I had some for extra colors if I decided to make any changes to the design, which inevitably happens.
In the morning, I covered each layer with fondant to make transportation much easier. I finished the safari hat, which was just a small rounded cake, which I had baked in a small well greased metal bowl. I covered it in buttercream and beige fondant, added a few strips and voila, it was done. That was a pretty simple task. I took all the cakes to my Fellow mommy's house and with the help of a 1 year old, 2 year old, a 16 year old sister and a dog, we finished decorating the cakes. I pretty much let my friend have control over the decorations, just helped her with the technical issues, such as how to glue fondant together (with water) and how to clean off cornstarch (with vodka).
The final product ended up being really cute and was definitely a hit at the party.
I learned at least 2 lessons from this project; one, always make sure you know the scope of a project before agreeing to it... And two, I 100% understand why they charge so much for these cakes. If I were charging, I calculated that I spent about $50 on supplies and approximately 10hours planning, baking, making and decorating this cake. This one year old hit the jackpot this year with a $250 present :).
 

Wednesday, May 16, 2012

Pièce de Résistance - The Cake

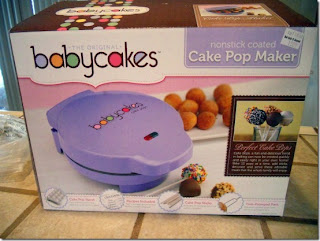
This year, I had big plans! I wanted to make cake pops. I spent hours googling pictures and getting ideas for different kinds of cake pops. However, my one concern was that they would be too sweet for everyone- the traditional way including rolling icing and cake crumbles together. My mom had seen this cake pop maker and bought it for me one day. This way they would be fluffier and lighter.
I assembled the troops Saturday, the day before the party. I recruited everyone who was home at my parents, my mom, sister and Grandma and Grandpa who were visiting from Ontario. We started by mixing 3 seperate batters that are found in the recipe book included: chocolate, vanilla and lemon. Vanilla and lemon made really thick batters, so I poured them in a freezer ziploc bag (it needs to be the heavy duty ones or it will break on you) and cut the corner. This allowed me to pipe them into the machine quickly and with much less mess. The chocolate one was much runnier, so I put it in a measuring cup; This made it easy to pour into the machine. The trick I found with all batters was to pour as much in as possible without it spilling over and don't open the machine for atleast a minute. One baked I placed the cake pops in the tray provided with the machine to keep them round, but ran out of room quickly. I found that putting them in egg cartons was almost as effective at keeping them round. Then we let them cool for a few minutes.

If you don't have a cake pop machine, then you could always use these directions here. This shows the traditional way to make them, and you don't need any special tools.

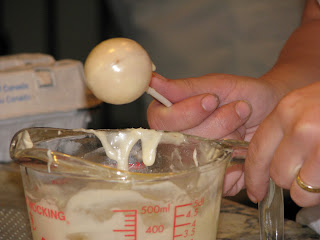
After they were cool, we needed to put the sticks in. I used the lollipop sticks that came with the cake pop maker (you can always find some more at Michaels) and long wooden skewers, because we needed some on longer sticks (and we had those lying around). We dipped the sticks in chocolate and stuck them in the cake ball. Then they went into the freezer for about 15minutes. This makes them easier to work with and ensures that they do not fall off the sticks.

Then it was time to dip them in icing. I used the recipes here from the book that came with the cake pop maker. We did chocolate icing and vanilla glaze. Both were extremely easy to work with. The only challenge was finding the best consistency. Too warm and it dripped too much, too cool and it wasn't smooth.

Right after dipping they were decorated with sprinkles, nuts, toasted coconut, toffee bits...pretty much
whatever we had. I bought some cool sprinkles at Bulk Barn, but not nearly enough. It worked to roll the pops in the toppings, but sprinkling some on the tops also looked neat. I left a few with just plain chocolate, and later I melted blue candy melts (from Bulk Barn) and piped on designs with a piping bag, using the smallest tip I had.
We needed space to have the cake pops dry. They had to stand straight us so they didn't have an indent on the top. Using egg cartons, we poked holes in the top and filled the bottom with rice (to ensure that they didn't tip over). They then went in the fridge for a few minutes to make sure they were good and set.

The next challenge was transport. I had made them at my parents house because they have much more space. But, the party was at my house. My Step-Dad came up with the great idea of placing styrofoam on the bottom of a giant cooler and poking the cake pops in. This kept them upright and cool. It worked perfectly and they all survived the 20km trip home.

Once home I made the display. I had already bought a flower pot and floral foam (can find both at the Dollar Store). I filled the bottom of the pot with the floral foam and then started sticking the cake pops in. I was going for a "flower arrangement." Basically put the longer ones in the middle and used shorter ones as I went around.

Here is how it turned out.... Like?!

I also made a cake just for Little Dude. I baked a small cake directly in a flower pot. Once it was done baking I crumbled the cake a bit to look like dirt. I then added a few gummy worms coming out. Cake Pop in the middle, candles and viola! I wanted him to be able to blow out the candles, which he couldn't do on the big arrangement. Here is his little cake!

Lastly, I needed to have something to serve extras. So, I wrapped a peice of floral foam in brown paper, tied a ribbon around it. I secured the ribon with a thumb tack I found at the Dollar Store. Then I just stuck in a few cake pops.

It was good I did because the cake pops went fast!

Overall, the party was a success and the cake pops were a hit! Everyone loved them and they are perfect for a kids birthday party. No forks, plates and clean-up later...well maybe a bit of laundry...

Wednesday, April 25, 2012

Thinking Back - Baby's First Birthday!

My little dude's 2nd birthday is coming up and it has me reflecting on his first. I was quite (overly?) ambitious for little dudes first birthday. But, it is a big event. It means we managed to keep him alive for an entire year and we are still somewhat sane.

I had been wanting to try making a fondant cake since cake shows started appearing all over TV. My little dude's first birthday seemed like the perfect event. As he was a cow for his first Halloween, I decided to carry that theme through and do a barnyard theme for his first birthday. I had also had a book for a long time showing me how to make cute little animals that I really wanted to try out. I searched the internet for inspiration and found quite a few ideas. I showed Hubby, who said I should do whatever I like, but he wasn't interested in helping me.

I went to look at buying fondant and found that it was ridiculously expensive to purchase ready made. So, I thought I could make my own. A search on the internet brought up marshmallow fondant and many reviews said it tasted great. I then had to decide what type of cake and buttercream to make. I tried to figure out what went with marshmallows and I obviously landed on chocolate and graham cracker... a s'mores cake! For the graham cracker cake I started with a vanilla box cake (I know, I know, I'm a terrible person) and added a few ingrediants. I found a  recipe for chocolate buttercream, which turned out to be really simple and tasted like heaven.

I started assembling the cakes the day before. Getting the buttercream on smooth was not as easy as Cake Boss made it look like. I struggled for a bit, until Hubby came to check out the progress. He gave me suggestions and promotly took over. He is a perfectionist and made it look perfect. We did the fondant together. I had made it at my mom's the day before, because she has a bix mixer and making the fondant would have been almost impossible without it. The only thing I should have done differently was mix the main colour into the fondant with the mixer, because doing it by hand was A LOT of work!

I shaped the little animals and built the barn out of Rice Crispie treats, while Hubby covered the cake and made the fence. It was much more work than anticpated and took us into the early morning. After a few hours of sleep we got up for the big day. It looked nice, but I had seen on Cake Boss that they always steam their cakes to make them look shiny. We don't have a steamer sitting around, so Hubby suggested we use the iron... It seemed like a risky idea to me. I was terrified that we would either melt the cake. In the end he did it anyways and it looked awesome.

Here is the finished product... What do you think?


Of course, for a first birthday you also need a smash cake. I am too cheep to buy a small cake pan, so I bought a little metal bowl from the dollar store, greased it really well and made a tiny version of the cake in it. I covered it with fondant and gave it a cow pattern. It was really quick.

I really enjoyed the process. Hubby says he is never doing it again...


That was last years project and we are quickly approaching Little Dude's second birthday. It happens to fall on mother's day and I have a ton of ideas up my sleeve!