Showing posts with label recipe. Show all posts

Wednesday, August 21, 2013

Leftover pizza

How do you get rid of leftovers? I could not get anyone in my family to eat them! They don't want to eat the same thing again... So, I started putting everything ( well a lot) on pizza. They love it. Not only do they get something different. They also get pizza!!

I love homemade pizza, but I always forget to make the dough early enough, so I started using this recipe. It uses regular yeast, but is very quick. Also, I never roll the dough out anymore, I stretch is out. Pulling from the center. I get a rounder pizza and the bread gets us much nicer consistency when baked.

Almost any left over meat works awesome on pizza. Had a BBQ last night, take the left over steak and make a BBQ steak pizza. It works well to mix tomato sauce 50/50 with BBQ sauce for a great base, without an overpowering BBQ sauce taste. Fajitas on Monday? That filling is an awesome topping for a pizza, with a bit of tex mex cheese on top.. Mmm. Chicken and mushrooms left, throw it on...pulled pork? That could be an interesting flavor!

I hope everyone gets creative, has a great pizza night and that less food goes to waste!


Wednesday, October 17, 2012

When marshmallows die and go to heaven...

I have recently discovered the greatest (and maybe easiest) project Ever!! Homemade marshmallows! I had no idea this was possible. Actually, I had always assumed that marshmallows were chemical filled pillows; granted yummy pillows, but still filled with chemicals. I found a recipe on Pinterest and decided to try it out. Here's the link to the recipe.

It calls for "light corn syrup"which I couldn't find, until a little googling taught me that it means light in colour, not light as in sugar content. I could only find golden corn syrup, so that I what I used. I flavored mine with vanilla. I attempted to make ghosts, but, they didn't look great. I made some that I cut into squares, which turned out great. I have been using them in my hot chocolate all week...

I also tried making some in silicone ice cube molds. I have little heart molds from ikea that I used. I greased them well and put a generous layer of powdered sugar/corn starch mixture on them. I filled a ziplock bag with the marshmallow fluff, cut the corner and filled the mold almost full. When I first tried taking them out I was concerned, they were a bit stuck, however,when I flipped the mold inside out, I realized they stayed intact, even if I needed to pull them a bit.

I then got creative and decided to coat them in chocolate. I just melted chocolate chips and added a bit of crisco to make it runnier and smoother. I attempted to just dip them, but they got messy and didn't look uniform. After a bit of pondering, I cleaned the silicone molds, dried them well and put some chocolate in the bottom of each on. Just about a 1/4 full. I then took the marshmallows and pressed them back into the molds, into the chocolate. This worked great. I tired putting them in the fridge, but the chocolate cracked when I tried to pop them out again. So, I put them in the freezer for 20 min or so. Then they popped out great.

I took mini cupcake liners and dipped them in a tiny bit of food color, mixed with water. Let them dry. And this is what I ended up with...

I think that they could make a great Christmas present for friends. I am going to keep trying and see what different combinations I can find and better ways for the chocolate. In the meantime, I encourage everyone to take an hour (including prep and clean up) to try making your own marshmallows. They're way better than Any store bought ones and are sure to impress everyone!!


Friday, September 21, 2012

Homemade Cheese

So, we did it! Mom and I took the plunge and made mozzarella cheese!! It was super easy using the instructions here. The citric acid was easy to find, you can find it at most wine stores. The hard one to find was the rennet, but, it can be ordered on the Internet for cheap. The entire time we were doing it we were sure it must be wrong, nothing seemed to be exactly as the picture.

Here is our version of how it went down...

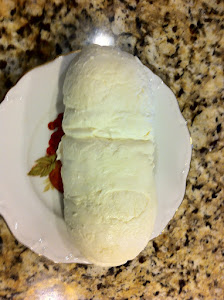
The final product... Drumroll please....

It turned out exactly as it should!

And throw it on some pizza and you get?

...a masterpiece... This is what my mom made for dinner... I will use mine tonight!!!

Adding it up, it's pretty cheap... You barely use anything other than the milk, so it was probably less than $5 for all the cheese!!

Wednesday, May 16, 2012

Pièce de Résistance - The Cake

This year, I had big plans! I wanted to make cake pops. I spent hours googling pictures and getting ideas for different kinds of cake pops. However, my one concern was that they would be too sweet for everyone- the traditional way including rolling icing and cake crumbles together. My mom had seen this cake pop maker and bought it for me one day. This way they would be fluffier and lighter.
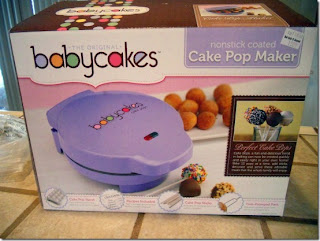
I assembled the troops Saturday, the day before the party. I recruited everyone who was home at my parents, my mom, sister and Grandma and Grandpa who were visiting from Ontario. We started by mixing 3 seperate batters that are found in the recipe book included: chocolate, vanilla and lemon. Vanilla and lemon made really thick batters, so I poured them in a freezer ziploc bag (it needs to be the heavy duty ones or it will break on you) and cut the corner. This allowed me to pipe them into the machine quickly and with much less mess. The chocolate one was much runnier, so I put it in a measuring cup; This made it easy to pour into the machine. The trick I found with all batters was to pour as much in as possible without it spilling over and don't open the machine for atleast a minute. One baked I placed the cake pops in the tray provided with the machine to keep them round, but ran out of room quickly. I found that putting them in egg cartons was almost as effective at keeping them round. Then we let them cool for a few minutes.

If you don't have a cake pop machine, then you could always use these directions here. This shows the traditional way to make them, and you don't need any special tools.

After they were cool, we needed to put the sticks in. I used the lollipop sticks that came with the cake pop maker (you can always find some more at Michaels) and long wooden skewers, because we needed some on longer sticks (and we had those lying around). We dipped the sticks in chocolate and stuck them in the cake ball. Then they went into the freezer for about 15minutes. This makes them easier to work with and ensures that they do not fall off the sticks.

Then it was time to dip them in icing. I used the recipes here from the book that came with the cake pop maker. We did chocolate icing and vanilla glaze. Both were extremely easy to work with. The only challenge was finding the best consistency. Too warm and it dripped too much, too cool and it wasn't smooth.

Right after dipping they were decorated with sprinkles, nuts, toasted coconut, toffee bits...pretty much
whatever we had. I bought some cool sprinkles at Bulk Barn, but not nearly enough. It worked to roll the pops in the toppings, but sprinkling some on the tops also looked neat. I left a few with just plain chocolate, and later I melted blue candy melts (from Bulk Barn) and piped on designs with a piping bag, using the smallest tip I had.
We needed space to have the cake pops dry. They had to stand straight us so they didn't have an indent on the top. Using egg cartons, we poked holes in the top and filled the bottom with rice (to ensure that they didn't tip over). They then went in the fridge for a few minutes to make sure they were good and set.

The next challenge was transport. I had made them at my parents house because they have much more space. But, the party was at my house. My Step-Dad came up with the great idea of placing styrofoam on the bottom of a giant cooler and poking the cake pops in. This kept them upright and cool. It worked perfectly and they all survived the 20km trip home.

Once home I made the display. I had already bought a flower pot and floral foam (can find both at the Dollar Store). I filled the bottom of the pot with the floral foam and then started sticking the cake pops in. I was going for a "flower arrangement." Basically put the longer ones in the middle and used shorter ones as I went around.

Here is how it turned out.... Like?!

I also made a cake just for Little Dude. I baked a small cake directly in a flower pot. Once it was done baking I crumbled the cake a bit to look like dirt. I then added a few gummy worms coming out. Cake Pop in the middle, candles and viola! I wanted him to be able to blow out the candles, which he couldn't do on the big arrangement. Here is his little cake!

Lastly, I needed to have something to serve extras. So, I wrapped a peice of floral foam in brown paper, tied a ribbon around it. I secured the ribon with a thumb tack I found at the Dollar Store. Then I just stuck in a few cake pops.

It was good I did because the cake pops went fast!

Overall, the party was a success and the cake pops were a hit! Everyone loved them and they are perfect for a kids birthday party. No forks, plates and clean-up later...well maybe a bit of laundry...

Monday, May 14, 2012

Hydrating and Feeding the Guests

This year I did a spring/garden theme. It was Mother's Day and a 2 year old birthday, so I needed it to fit both occassions. Spring could be a girly theme, so I made attempts to make it better for a little boy. One thing I have wanted to try out for a long time is old fashioned lemonade. I looked everywhere for a recipe I liked landed on this one - here. It's sparkling raspberry lemonade. It was festive and fresh, for the hot day we had.

I also spent the week making ice cubes (I only have one ice cube tray). I froze raspberries and lemon in ice. I used fresh lemons and frozen raspberries. My first batch of raspberry ice cubes, I just dropped raspberries in the water and froze it together. The water turned really red from the juice, as they defrosted slightly. The berries became hidden in the cube and didn't have the impact I wanted. I tried half freezing the cubes but, that also did not look perfect. For the last attempt I filled the trays half way with water, took them out, placed the berries on top and poured ice water over it to freeze it the rest of the way. The lemons I just tossed in the water and froze it all together. In the end they both turned out great!


I also wanted some snack foods, but we were having an early dinner and didn't need anything big. I decided on a veggie tray. I just cut up veggies like usual and added dip in the center. It didn't match the theme, so I added gummy worms around and veggies. It made it more fun and was perfect for a 2 year old boy's birthday party.
Everyone left full and hydrated at the end of the day!