Showing posts with label birthday. Show all posts

Friday, August 16, 2013

Little dude turns 3!!

This year for little dudes birthday we were very busy. I had just finished my last semester at university, I was working full time and I was 7 months pregnant. I didn't have a lot of time to make a huge time consuming birthday cake. When I saw someone do a similar version of this cake I knew our little dude would love it. He's obsessed with machinery.
I went to walmart and found a cheap set of construction vehicles. Then I made a box (! I know shocking...) chocolate cake and iced it with a simple chocolate buttercream icing. After it was all iced, hubby took a knife and simply chopped out a chunk from the side. We positioned the vehicles on the cake and added some Oreo cookie crumbs to the cake to make it look more like dirt. And tada... It was that simple.


Wednesday, September 12, 2012

Safari Birthday

My good friend asked me to help her make her son's first birthday cake. I decided it was the least I could do to celebrate the fact that they had survived their first year together as a family. I was excited to help, but nervous when she said that there would be almost 60 guests at this party! This meant it would have to be much larger than any of the cakes I had made so far.

She choose the theme "safari." After much googling, I came up with a few ideas. The original idea looked somewhat like this. 2 tiers, covered in fondant. On the inside I made a marble cake, chocolate and white cake. It ended up being pretty neat, because when it was cut it looked like zebra stripes. ( just google "zebra cake batter design" and you will see what I am taking about and how to do it). We also decided to do a little smash cake in the shape of a safari hat.

I baked the cakes, leveled and added crumb coat, with the help of my husband, the day before we decorated. Then, I let them set overnight in the fridge to make the icing nice and hard. The key is to cut the "domes" that form while baking all the way off to leave a level top on each cake. Then, put a thick layer of buttercream of the top. Take the second layer, and place it cut side down on the buttercream. It can be pressed a bit to make it completely level on top. Now you have the somewhat smoother bottom on top, which is much easier to ice than the crumbly side that was cut. A generous layer of buttercream is added on the whole cake. This is important because it helps the fondant stick.

I had pre made the fondant with the help of my mom. She has a kitchen aid mixer, so it makes the process much simpler. I made marshmallow fondant, as I mentioned in other posts, however, this time I precoloured them all in the mixer to avoid having to do it by hand again. This simply required a bit of planning to know approximately what I wanted. I did leave one chunk white, so that I had some for extra colors if I decided to make any changes to the design, which inevitably happens.
In the morning, I covered each layer with fondant to make transportation much easier. I finished the safari hat, which was just a small rounded cake, which I had baked in a small well greased metal bowl. I covered it in buttercream and beige fondant, added a few strips and voila, it was done. That was a pretty simple task. I took all the cakes to my Fellow mommy's house and with the help of a 1 year old, 2 year old, a 16 year old sister and a dog, we finished decorating the cakes. I pretty much let my friend have control over the decorations, just helped her with the technical issues, such as how to glue fondant together (with water) and how to clean off cornstarch (with vodka).
The final product ended up being really cute and was definitely a hit at the party.
I learned at least 2 lessons from this project; one, always make sure you know the scope of a project before agreeing to it... And two, I 100% understand why they charge so much for these cakes. If I were charging, I calculated that I spent about $50 on supplies and approximately 10hours planning, baking, making and decorating this cake. This one year old hit the jackpot this year with a $250 present :).
 

Wednesday, May 23, 2012

Summer Centerpeices

For my little Dude's birthday I wanted to make some centerpeices for the tables outside. My initial thought was simple vases with spring flowers. But, I thought maybe something a bit more kid friendly was in order. Little Dude had gotten a tiny pinwheel from my inlaws (who live overseas) in their last care package and he loves it. They look simple enough to make, so I googled a few ideas. It turns out, it is pretty much as easy as I had thought.

I have a ton of scrapbooking paper with pretty designs that I have had for years, so I decided that this would be a perfect use for it. Other than that I used chopsticks (save the wooden ones you get when you order chinese food) and a thumb tack. I used the directions here.... Well, actually, it was the day before Little Dude's party, so Hubby put them together for me!

One they were together, I took the jars that I had made (check them out here), filled them with a bit of sand from the sandbox and stuck the pinwheels in. Any jar would work though, or even a bucket from the sandbox or a glass.

They were a cute addition to the party, and everyone had fun playing with them afterwards.

Wednesday, May 16, 2012

Pièce de Résistance - The Cake

This year, I had big plans! I wanted to make cake pops. I spent hours googling pictures and getting ideas for different kinds of cake pops. However, my one concern was that they would be too sweet for everyone- the traditional way including rolling icing and cake crumbles together. My mom had seen this cake pop maker and bought it for me one day. This way they would be fluffier and lighter.
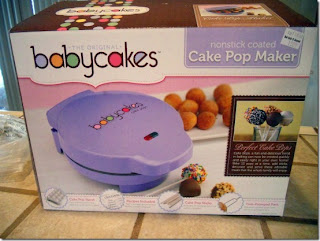
I assembled the troops Saturday, the day before the party. I recruited everyone who was home at my parents, my mom, sister and Grandma and Grandpa who were visiting from Ontario. We started by mixing 3 seperate batters that are found in the recipe book included: chocolate, vanilla and lemon. Vanilla and lemon made really thick batters, so I poured them in a freezer ziploc bag (it needs to be the heavy duty ones or it will break on you) and cut the corner. This allowed me to pipe them into the machine quickly and with much less mess. The chocolate one was much runnier, so I put it in a measuring cup; This made it easy to pour into the machine. The trick I found with all batters was to pour as much in as possible without it spilling over and don't open the machine for atleast a minute. One baked I placed the cake pops in the tray provided with the machine to keep them round, but ran out of room quickly. I found that putting them in egg cartons was almost as effective at keeping them round. Then we let them cool for a few minutes.

If you don't have a cake pop machine, then you could always use these directions here. This shows the traditional way to make them, and you don't need any special tools.

After they were cool, we needed to put the sticks in. I used the lollipop sticks that came with the cake pop maker (you can always find some more at Michaels) and long wooden skewers, because we needed some on longer sticks (and we had those lying around). We dipped the sticks in chocolate and stuck them in the cake ball. Then they went into the freezer for about 15minutes. This makes them easier to work with and ensures that they do not fall off the sticks.

Then it was time to dip them in icing. I used the recipes here from the book that came with the cake pop maker. We did chocolate icing and vanilla glaze. Both were extremely easy to work with. The only challenge was finding the best consistency. Too warm and it dripped too much, too cool and it wasn't smooth.

Right after dipping they were decorated with sprinkles, nuts, toasted coconut, toffee bits...pretty much
whatever we had. I bought some cool sprinkles at Bulk Barn, but not nearly enough. It worked to roll the pops in the toppings, but sprinkling some on the tops also looked neat. I left a few with just plain chocolate, and later I melted blue candy melts (from Bulk Barn) and piped on designs with a piping bag, using the smallest tip I had.
We needed space to have the cake pops dry. They had to stand straight us so they didn't have an indent on the top. Using egg cartons, we poked holes in the top and filled the bottom with rice (to ensure that they didn't tip over). They then went in the fridge for a few minutes to make sure they were good and set.

The next challenge was transport. I had made them at my parents house because they have much more space. But, the party was at my house. My Step-Dad came up with the great idea of placing styrofoam on the bottom of a giant cooler and poking the cake pops in. This kept them upright and cool. It worked perfectly and they all survived the 20km trip home.

Once home I made the display. I had already bought a flower pot and floral foam (can find both at the Dollar Store). I filled the bottom of the pot with the floral foam and then started sticking the cake pops in. I was going for a "flower arrangement." Basically put the longer ones in the middle and used shorter ones as I went around.

Here is how it turned out.... Like?!

I also made a cake just for Little Dude. I baked a small cake directly in a flower pot. Once it was done baking I crumbled the cake a bit to look like dirt. I then added a few gummy worms coming out. Cake Pop in the middle, candles and viola! I wanted him to be able to blow out the candles, which he couldn't do on the big arrangement. Here is his little cake!

Lastly, I needed to have something to serve extras. So, I wrapped a peice of floral foam in brown paper, tied a ribbon around it. I secured the ribon with a thumb tack I found at the Dollar Store. Then I just stuck in a few cake pops.

It was good I did because the cake pops went fast!

Overall, the party was a success and the cake pops were a hit! Everyone loved them and they are perfect for a kids birthday party. No forks, plates and clean-up later...well maybe a bit of laundry...

Monday, May 14, 2012

Hydrating and Feeding the Guests

This year I did a spring/garden theme. It was Mother's Day and a 2 year old birthday, so I needed it to fit both occassions. Spring could be a girly theme, so I made attempts to make it better for a little boy. One thing I have wanted to try out for a long time is old fashioned lemonade. I looked everywhere for a recipe I liked landed on this one - here. It's sparkling raspberry lemonade. It was festive and fresh, for the hot day we had.

I also spent the week making ice cubes (I only have one ice cube tray). I froze raspberries and lemon in ice. I used fresh lemons and frozen raspberries. My first batch of raspberry ice cubes, I just dropped raspberries in the water and froze it together. The water turned really red from the juice, as they defrosted slightly. The berries became hidden in the cube and didn't have the impact I wanted. I tried half freezing the cubes but, that also did not look perfect. For the last attempt I filled the trays half way with water, took them out, placed the berries on top and poured ice water over it to freeze it the rest of the way. The lemons I just tossed in the water and froze it all together. In the end they both turned out great!


I also wanted some snack foods, but we were having an early dinner and didn't need anything big. I decided on a veggie tray. I just cut up veggies like usual and added dip in the center. It didn't match the theme, so I added gummy worms around and veggies. It made it more fun and was perfect for a 2 year old boy's birthday party.
Everyone left full and hydrated at the end of the day!

Birthday Ballon Wreath

It's Official, my little dude is now 2! We had a little gathering yesterday with family and I thought I'd share a few of my projects.

One of my first projects I did this year is a ballon wreath. It was pretty simple. All I needed was a straw wreath, any ribbon, which I got at Micheals (just make sure to rip the coupon out of the paper, you can even pick one up at the store) floral picks and a large bag of ballons, which you can get at Walmart, or the dollar store. I used approximately 70 ballons.
I just wrapped the wire from the floral picks around the base of the ballon and then stuck it in to the wreath. Overlap the ballons, so you cover most of the wreath. It took me a couple times of moving ballons to get it to look nice.
One the ballons were all around I just took a peice of ribbon and tied it around.
I hung it on the gate so that all of our guests saw it as they arrived! It was a big hit. The best thing about it is that I can put it away and use it again next year. Only 364 days and my little dude will be 3!!

Wednesday, May 9, 2012

Tell everyone I'm TWO!

Little Dude is going to be 2 on Sunday! I can hardly believe it. I wanted him to have a special shirt for his birthday, but I also wanted him to be able to wear it again. Most shirts say "It's my birthday," "Birthday Boy," and that type of thing...not what I was looking for. Therefore, I decided to make him one myself.


I bought a plain white shirt from Old Navy for a few dollars (its the baby sale - 30% off everything!!) and took a scrap peice of fabric from my mom's quilting box. You could use just about anything though. An old dress shirt, skirt or some other peice of clothing that you will never wear again. Anything with a large enough space to cut out your number (or letter depending on your project). I printed off a letter in Antique Olive Compact font, approximately size 500 as a template. Lastly, you need some fusible webbing. Fusible webbing is great stuff. It is basically a plastic fiber sheet to attach two fabrics together using an iron.


I cut the peice of fabric and fusible webbing large enough to accomodate the number I had printed. Try not to let the fusible webbing hang over the sides of the fabric or you might end up melting it to your ironning board. You pull off one side of the plastic and iron it to the backside of your fabric. While it is cooling, cut out your number template. I drew my template on the fabric before I cut it, but you could also just pin it on or freehand it. Make sure you draw it on the fabric side rather than the side with the fusible webbing, otherwise you'll get a backwards number. Cut the fabric number out. Pull off the paper from the fusible webbing and place it on the t-shirt. Then simply iron it on. Let it cool and voila!

I sewed a little border on with the sewing machine, but it didn't really need it. Here is how the back looks!


The front looked a bit boring so I decided to put a little two on the front pocket. I followed the same steps. I love the way it looks and can't wait for Little Dude to wear it on his birthday. I showed him...he seemed quite indifferent about it, I'm sure he loves it deep down.


Friday, May 4, 2012

Birthday Season

Not only is my little dude turning TWO, everyone else in my family seems to have birthdays around this time of year.
I needed a few birthday cards today, so I had to find things around my house. I recently purchased some Washi Tape online. Its Japanese masking tape with cute patterns on it. The shop has a ton of different ones and ships pretty much anywhere in the world. I originally bought it for a picture journal for my summer adventures (...but thats another blog...).

Basically I just ripped pieces and taped them on a plain peice of paper and used a sharpie to write the words. I cut out the paper and taped it glued it on heavier paper. They were super quick, easy and cheap!! No more $5 greeting cards for me! I think that they turned out pretty well!
Happy Birthday Everyone, Everywhere!!!\